If you have ever stood over a beaker of thick, stubborn coating, you know the frustration. Trying to mix high viscosity paint can feel like stirring wet cement. You end up with dry pockets of powder, massive trapped air bubbles, and a formula that just won’t flow.
Scaling down the process doesn’t make it any easier. In fact, small batches can be notoriously finicky because you don’t have the heavy gravity and massive shear force of industrial-sized vats working in your favor.
Let’s talk about how to get that perfectly smooth, homogeneous blend every single time, without burning out your motor or your patience.
Why Is It So Hard to Mix High Viscosity Paint?
Viscosity is simply a fluid’s resistance to flow. Water has low viscosity; honey has high viscosity. Heavy-duty paints, epoxies, and specialized industrial coatings often have incredibly high viscosity because they are packed with solid pigments, binders, and thickeners.
When you attempt to mix high viscosity paint, the sheer thickness prevents natural flow around the mixing blade. Instead of blending, the material simply pushes away from the shaft, creating a localized hole while the rest of the batch sits entirely unmixed.
7 Brilliant Strategies to Mix High Viscosity Paint in Small Batches
Small batches in the lab require finesse. Here is how the pros handle thick materials without pulling their hair out.
1. Choose the Right Disperser Blade
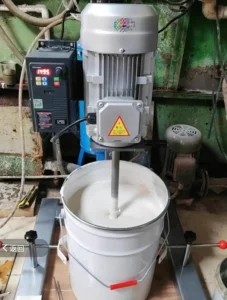
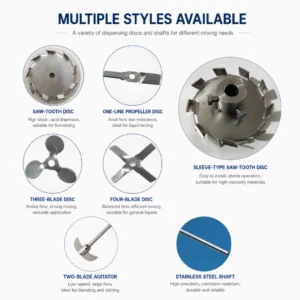
You cannot use a standard marine propeller for thick pastes. Propellers simply move liquids up and down. For thick paints, you need a Cowles blade (sawtooth disperser). The high-shear teeth physically tear the thick agglomerates apart.
2. Master Your RPMs
Speed is tricky. Start agonizingly slow to incorporate dry powders into the thick resin. Once the powders are wet, you can ramp up the RPMs. But don’t go too fast—excessive speed in a small container will throw your expensive formulation right out of the beaker.
3. Keep an Eye on Temperature
High-shear mixing generates mechanical heat. In thick materials, this heat can’t escape easily. If your batch gets too hot, it might cure prematurely or degrade the ingredients. Consider using a double-jacketed beaker hooked to a cooling bath to keep temps stable.
4. Create the Perfect Vortex
Your goal when you mix high viscosity paint is to create a mild donut-shaped vortex. The material should roll from the edge of the container, down into the center of the blade, and back out. If the blade just spins in a cavern of air, your paint is too thick for that specific blade size.
5. Avoid Whipping in Air
Thick paints hold onto air bubbles like a sponge. Keep your mixing blade submerged deep enough so it doesn’t pull air from the surface. If you do trap air, you may need to toss your small batch into a vacuum degassing chamber before testing.
6. Scrape the Sides Regularly
In small 500ml or 1L batches, a significant amount of material clings to the walls of the vessel. Stop your mixer safely every few minutes and use a sturdy spatula to manually scrape the sides and bottom. This guarantees zero unmixed pockets.
7. Use Proper Lab-Scale Equipment
A handheld drill simply won’t cut it for professional results. You need a mixer with consistent torque that won’t stall when the going gets tough. If you’re outfitting a lab or a small production space, look into dedicated mixing equipment designed specifically for these challenges.
Sizing your equipment is arguably the most critical step. Using a blade that is too small for your container leaves dead zones. Using one that is too large causes excessive splashing. To get your sizing right, take a few minutes to read this incredibly helpful guide to selecting medium and small dispersers.
Common Mistakes When You Mix High Viscosity Paint
Even seasoned lab techs make errors when dealing with heavy pastes. The biggest mistake is assuming you can just add more solvent or water to thin it out. While that makes mixing easier, it completely ruins the intended chemical properties of your formulation.
Another fatal flaw is impatience. When you mix high viscosity paint, it takes time for the shear forces to break down pigment clumps. Rushing the dispersion phase leads to grainy finishes and poor color development.
Frequently Asked Questions (FAQ)
Can I use a regular power drill to mix high viscosity paint?
It is highly discouraged. Power drills lack the sustained torque required for thick materials. They tend to overheat, and they cannot maintain the steady, precise RPMs needed for a safe and effective lab-scale dispersion.
What is the best blade to mix high viscosity paint?
A high-shear Cowles impeller (sawtooth blade) is generally the best choice for dispersing pigments into thick paints. If you just need to blend (not disperse), an anchor or butterfly agitator works beautifully for high-viscosity materials.
How do I remove air bubbles after I mix high viscosity paint?
Because thick paints don’t let air rise naturally, the best method is vacuum degassing. Place your small batch container into a vacuum chamber for a few minutes. The negative pressure forces the trapped air to the surface and pops the bubbles.
References
To deepen your understanding of fluid dynamics, rheology, and the science behind thick coatings, check out these trusted resources:
- Understanding Viscosity: A comprehensive overview of how fluids resist flow and the physics behind it. Read more on Wikipedia.
- Basics of Rheology: Educational materials on fluid dynamics and sheer stress. Chemistry LibreTexts Guide.