Whether you’re formulating coatings, mixing heavy adhesives, or chasing the perfect shear on a new batch of resin, understanding viscosity is critical to your success.
In the industry, we measure dynamic viscosity in mPa·s (millipascal-seconds, which is functionally equivalent to centipoise, or cP). These measurements are typically taken at a standard room temperature of 25°C (77°F). The ultimate baseline? Plain water, which clocks in at roughly 1 mPa·s.
But what happens when you don’t have a viscometer handy on the shop floor? You can actually gauge a material’s viscosity just by observing how it behaves. Here is a practical, shop-floor breakdown of the five main viscosity levels, how to identify them by eye and touch, and the exact dispersion tools required for each.
Table of Contents
- 1. Low Viscosity | 1 – 100 mPa·s
- 2. Medium-Low Viscosity | 100 – 1,000 mPa·s
- 3. Medium-High Viscosity | 1,000 – 5,000 mPa·s
- 4. High Viscosity | 5,000 – 20,000 mPa·s
- 5. Ultra-High Viscosity | 20,000+ mPa·s
- The Quick-Reference Viscosity Guide
1. Low Viscosity | 1 – 100 mPa·s
The “Water-Like” Stage
Materials in this range are incredibly fluid, offering almost no resistance to movement.
- The Quick Test: Tilt the container, and the liquid flows and self-levels immediately. Dip a stirring stick into it, and the drips fall cleanly without forming any strings. Manual stirring feels entirely frictionless—exactly like stirring a glass of water.
- Common Materials: Water, solvents, alcohol, thin diluents, and ultra-low viscosity emulsions.
- Recommended Dispersion Tool: A standard Cowles (sawtooth) impeller running at high speeds.

2. Medium-Low Viscosity | 100 – 1,000 mPa·s
The “Light Syrup” Stage
Here, the liquid starts to gain a little body, but it remains highly manageable and easily pourable.
- The Quick Test: When you tilt the bucket, the flow is slightly delayed, leaving a thin film clinging to the container walls. A dipped stick will pull a very short, fine “string” before snapping quickly. Stirring by hand yields a slight but noticeable drag.
- Common Materials: Standard clear coats, topcoats, light industrial paints, and thin inks.
- Recommended Dispersion Tool: A standard sawtooth dispersion blade operating at medium-to-high speeds.
3. Medium-High Viscosity | 1,000 – 5,000 mPa·s
The “Heavy Honey” Stage
We are now entering thicker territory where proper equipment choice becomes critical to avoid overheating the motor or the batch.
- The Quick Test: Tilted containers reveal a sluggish flow that takes its time to self-level. Wall-cling is obvious and thick. A dipped stick pulls a medium-length string. Stirring by hand now requires deliberate physical effort.
- Common Materials: Interior latex paints, standard synthetic resins, and thick water-based slurries.
- Recommended Dispersion Tool: Wavy/corrugated dispersion blades or thickened sawtooth blades running at medium speeds.

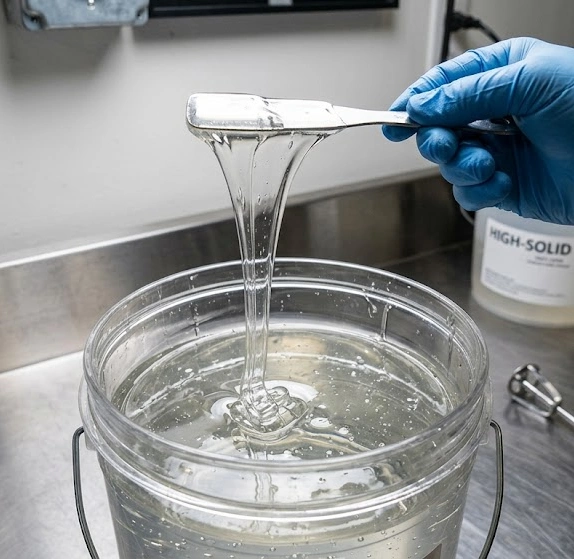
4. High Viscosity | 5,000 – 20,000 mPa·s
The “Thick Molasses” Stage
Materials in this bracket are highly resistant to flow. They require serious mechanical torque to shear properly.
- The Quick Test: Tilt the container, and the material creeps rather than flows, pouring in thick, continuous ribbons. It pulls long, stubborn strings that refuse to break. Stirring by hand is a workout—you have to actively fight the fluid’s resistance.
- Common Materials: Textured/art paints, heavy adhesives, high-solid resins, and dense color pastes.
- Recommended Dispersion Tool: Coarse “wolf-tooth” (aggressive sawtooth) blades operating at low-to-medium speeds with high torque.
5. Ultra-High Viscosity | 20,000+ mPa·s
The “Paste” Stage
At this extreme, we’ve moved past liquids entirely and entered the realm of heavy pastes and doughs.
- The Quick Test: The material is virtually immobile. Tilt the container, and nothing happens. It holds its shape perfectly without collapsing. Hand-stirring is practically impossible; the material will simply grab onto your stick and clump.
- Common Materials: Putty, body filler (Bondo), heavy sealants, and silicone pastes/greases.
- Recommended Dispersion Tool: Anchor, gate, or sweep-style agitators (preferably with wall scrapers). Standard blades will just carve a useless hole in the center. You need ultra-low speed and maximum torque.
The Quick-Reference Viscosity Guide
Keep this chart handy on the production floor for fast tool matching and material assessment.
| Level | Range (mPa·s) | Visual & Tactile Cues | Best Dispersion Tool |
|---|---|---|---|
| Low | 1 – 100 | Instant flow, no stringing, feels frictionless. | Standard Cowles, High Speed |
| Med-Low | 100 – 1,000 | Slower flow, short strings, light drag. | Standard Sawtooth, Med-High Speed |
| Med-High | 1,000 – 5,000 | Sluggish flow, medium strings, heavy to stir. | Wavy/Corrugated, Medium Speed |
| High | 5,000 – 20,000 | Creeps in ribbons, long strings, intense resistance. | “Wolf-Tooth”, Low-Med Speed, High Torque |
| Ultra-High | 20,000+ | No flow, holds shape, impossible to stir manually. | Anchor/Gate Agitator, Low Speed, Max Torque |
The Golden Rule of Thumb: When in doubt, watch the flow, check the stringing, and feel the resistance. These three cues will tell you exactly what kind of equipment you need to achieve the perfect mix.